Ways to Create Physical Files (PF):
1) Creating PF with DDS.
2) Creating PF without DDS.
3) Creating PF using *OUTFILE parameter.
4) Creating PF using SQL.
5) Using CPYF or CRTDUBOBJ commands.
Method 1: Creating PF with DDS (Data Description Specifications).
Physical Files have 4 DDS levels;
1) File Level DDS. It give the system information about the entire file. For example, you can specify whether all the key field values in the file must be unique.
2) Record format level DDS. It give the system information about a specific record format in the file. For example, when you describe a logical file record format, you can specify the physical file that it is based on.
3) Field level DDS. It give the system information about individual fields in the record format. For example, you can specify the name and attributes of each field.
4) Key field level DDS. It give the system information about the key fields for the file. For example, you can specify which fields in the record format are to be used as key fields.
For us to be able to understand more about these levels, let us start creating our PF.
File Definition:
Field Name, Description, Data Type, Length
P1LNME, Last Name, Character, 20
P1FNME, First Name, Character, 20
P1MINI, Middle Initial, Character, 1
P1AGE, Age Numeric, 2
P1CCDE, Course Code, Character, 5
P1CRDT, Create Date, Numeric, 8
P1CRTM, Create Time, Numeric, 6
P1UPDT, Update Date, Numeric, 8
P1UPTM, Update Time, Numeric, 6
note:
- PF is keyed by Last Name, First Name and Middle Initial.
- Records should be UNIQUE.
First in the command line type STRSEU then press F4 key. For Source File parameter we need to key in "QDDSSRC" (this is the source physical file that will hold PF and LF sources). Then for the Library parameter just input your library, for this tutorial i'll input "MyLibrary". For Source Member just enter "PFILE01" and then for Source Type parameter just enter "PF". Then for the Text Description parameter input "My Very First Physical File". Your screen should look like this:
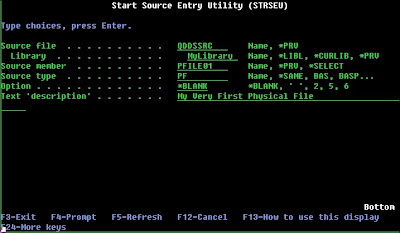
If you are done entering those parameters, just press ENTER key to proceed with DDS entry.
Now, let us create the 4 DDS levels of PF.
1)File level DDS. In position 6 of the SEU body enter "A" then press F4. You'll have a screen like this one:
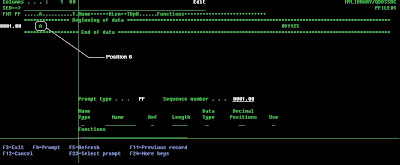
Then in the Functions column type "UNIQUE" then press ENTER key. This line will mark as our file level DDS.
2) Record level DDS. In position 6 of the SEU body enter "A" then press F4, for Name Type Column enter "R" (to indicate a record format name), then on the Name column input "PFILER1" (this one is your record format name). After you are done hit the ENTER key.
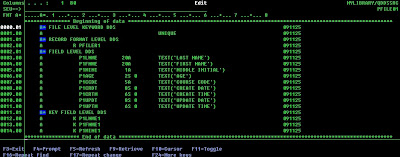
3) Field level DDS. In position 6 of the SEU body enter "A" then press F4, for the Name Column enter "P1LNME", Length Column input "20", Data Type Column enter "A", and for the Functions Column input "TEXT('LAST NAME')". Repeat what we have entered for the remaining 8 file fields. For data types; "A" represents character field, "S" (zoned decimal) as numeric field. For numeric field, Decimal Positions Column should have a value, for this exercise just enter "0" for all numeric fields. TEXT keyword is used to enter field descriptions.
4) Key field level DDS. In position 6 of the SEU body enter "A" then press F4, for Name Type Column enter "K" (to indicate a key field), then on the Name column input "P1LNME" (this represents your first key field). After you are done hit the ENTER key. Then do this again for the 2 remaining key fields.
After you are done your screen should look like this:
At the SEU command line on the top, just type FILE to save and exit SEU. Then to compile your PF just type this in the command line:
CRTPF FILE(MYLIBRARY/PFILE01) SRCFILE(MYLIBRARY/QDDSSRC) SRCMBR(PFILE01)
Method 2: Creating PF without DDS (Data Description Specifications).
We can create a physical file without DDS. This file will only contain 1 (one) field and by default the field will get the name of the PF. Here's the steps on how to create this type of PF:
a) Type CRTPF in the command line, then press F4.
b) Enter the desired file name in the FILE parameter.
c) Input your desired library.
d) Specify record/field length in the RCDLEN parameter.
e) Press ENTER key.
Your command should look like this one:
CRTPF FILE(QTEMP/MYFILE) RCDLEN(500)
Method 3: Creating PF using *OUTFILE parameter.
For this type of method, we can create PF using DSP command and then set the OUTPUT parameter to *OUTFILE. Here are some of the DSP commands that i normally use to create a PF:
1) DSPFD. I use this command to get file level information of a file and place the information inside a PF.
Command:
DSPFD FILE(MYLIBRARY/MYFILE) OUTPUT(*OUTFILE) OUTFILE(QTEMP/MYOUTFILE)
2) DSPFFD. I use this command to get field level information of a file and place the information inside a PF.
Command:
DSPFFD FILE(MYLIBRAY/MYFILE) OUTPUT(*OUTFILE) OUTFILE(QTEMP/MYOUTFILE)
3) DSPPGMREF. I use this command to get a list of system objects that my program is referencing and place the list inside a PF.
Command:
DSPPGMREF PGM(MYLIBRARY/MYPROGRAM) OUTPUT(*OUTFILE) OUTFILE(QTEMP/MYOUTFILE)
4) DSPDBR. I use this command to get a list of relational information about database files and place the list inside a PF.
Command:
DSPDBR FILE(MYLIBRARY/MYFILE) OUTPUT(*OUTFILE) OUTFILE(QTEMP/MYOUTFILE)
5) DSPFLR. I use this command to get a list of folders/documents and place the list inside a PF.
Command:
DSPFLR FLR(MYFOLDER) TYPE(*DOC) OUTPUT(*OUTFILE) OUTFILE(QTEMP/MYOUTFILE)
note: OUTFILE(QTEMP/MYOUTFILE) - contains the library (QTEMP) and the filename (MYOUTFILE) of the PF that I want to create.
Method 4: Creating PF using SQL.
If you are familiar with SQL, you can also create a PF using this method. Type STRSQL in the command line then press ENTER key. You can now enter SQL statement to create a table.
Sample SQL statement:
CREATE TABLE QTEMP/MYFILE
(FLD1 CHARACTER (3) NOT NULL WITH DEFAULT,
FLD2 NUMERIC (4,0) NOT NULL WITH DEFAULT)
Method 5: Using CPYF or CRTDUBOBJ commands.
You can also create a PF by copying or duplicating existing physical files.
1) Using CPYF:
CPYF FROMFILE(MYLIBRARY/MYFILE) TOFILE(QTEMP/MYCOPY) CRTFILE(*YES)
2) Using CRTDUPOBJ:
CRTDUPOBJ OBJ(MYFILE) FROMLIB(MYLIBRARY) OBJTYPE(*FILE) TOLIB(QTEMP) NEWOBJ(MYOBJECT)
You Might Also Want To Visit The Following Tutorial Posts:
AS/400 For Dummies
AS/400 Tutorial
SQL/400 Tutorial
Query/400 Tutorial


