Sorry guys I no longer have enough time to update. Feel free to browse this blog; who knows you might find what you are looking for.
AS/400 RPG RPGILE SQLRPG SQLRPGLE CLP CL CLLE QUERY/400 SQL/400 DDS SDA
WRKOBJ WRKLIB WRKOBJPDM WRKMBRPDM WRKLIB WRKQRY RUNQRY WRKFLR WRKJOB WRKACTJOB
WRKUSRJOB WRKSPLF DSPFFD DSPFD DSPPFM ADDPFM RMVM DLTF CPYF CPYSPLF CPYTOIMPF
CPYTOPCD CPYFRMIMPF CPYFRMPCD OVRDBF DLTOVR STRSEU STRRLU STRSDA CRTDUPOBJ
GRTOBJAUT CHGOBJOWN WRKSBS WRKASPBRM WRKMEDIBRM DSPSYSSTS DSPPGMREF DSPOBJD
You Might Also Want To Visit The Following Tutorial Posts:
AS/400 For Dummies
AS/400 Tutorial
SQL/400 Tutorial
Query/400 Tutorial
Read More...
Saturday, June 15, 2013
Monday, November 7, 2011
(Q&A) What is AS/400 used for?
(From : Anonymous)
AS/400 is considered to be a midrange computer. Features include a RDBMS (DB2/400), a menu-driven interface, multi-user support, dumb terminal support (IBM 5250), printers, as well as security, communications and web-based applications.
AS/400 is accessed either through a "front end" running on the user’s computer which displays requested data or the "back end" which runs on the server and handles tasks such as data analysis and storage.
You Might Also Want To Visit The Following Tutorial Posts: AS/400 For Dummies AS/400 Tutorial SQL/400 Tutorial Query/400 Tutorial
Read More...
AS/400 is considered to be a midrange computer. Features include a RDBMS (DB2/400), a menu-driven interface, multi-user support, dumb terminal support (IBM 5250), printers, as well as security, communications and web-based applications.
AS/400 is accessed either through a "front end" running on the user’s computer which displays requested data or the "back end" which runs on the server and handles tasks such as data analysis and storage.
You Might Also Want To Visit The Following Tutorial Posts: AS/400 For Dummies AS/400 Tutorial SQL/400 Tutorial Query/400 Tutorial
(Q&A) How long could be file, library or member name ?
(From : Anonymous)
Library names, file names and member names can be 10 characters long.
You Might Also Want To Visit The Following Tutorial Posts: AS/400 For Dummies AS/400 Tutorial SQL/400 Tutorial Query/400 Tutorial
Read More...
Library names, file names and member names can be 10 characters long.
You Might Also Want To Visit The Following Tutorial Posts: AS/400 For Dummies AS/400 Tutorial SQL/400 Tutorial Query/400 Tutorial
Thursday, February 4, 2010
(AS/400 For Dummies) Creating Logical File
After Creating a physical file we can now create logical file. What is a Logical File? A logical file is a database file that logically represents one or more physical files. It contains a description of how data is to be presented to or received from a program. This type of database file contains no data, but it defines record formats for one or more physical files. Logical files let users access data in a sequence and format that is different from the physical files they represent. From the perspective of the SQL interface, logical files are identical to views and indexes.
Logical files have 5 DDS levels, levels 1-4 are similar to the DDS levels of physical file. In this chapter I will only explain the 5th DDS level.
1) File Level DDS
2) Record Format Level DDS
3) Field Level DDS
4) Key Field Level DDS
5) Select/Omit Level DDS. The system can select and omit records when using a logical file. This can help you to exclude records in a file for processing convenience or for security.
Let's try creating our first simple logical file. We will use PFILE01 that we created during our PF creation. Just follow these simple steps:
1) Record Format Level DDS. In position 6 of the SEU body enter "A" then press F4, for Name Type Column enter "R" (to indicate a record format name), then on the Name column input "PFILER1" (this one is your record format name). In the functions column enter this keyword; PFILE(PF Name), this will identify the physical file being referenced and it is a required keyword. After you are done hit the ENTER key. It should look like this:
A R PFILER1 PFILE(PFILE01)
2) Key field Level DDS. In position 6 of the SEU body enter "A" then press F4, for Name Type Column enter "K" (to indicate a key field), then on the Name column input "P1LNME" (this represents your first key field). After you are done hit the ENTER key. It should look like this:
A K P1LNME
3) Select/Omit Level DDS. Now let's try to filter some records in our file. In position 6 of the SEU body enter "A" then press F4, for Name Type Column enter "S" (to select specific records), then on the Name column input "P1AGE" (this represents your field to select from). On the functions column type CMP(LT 40), this will enable us to select all records with P1AGE less than 40. After you are done hit the ENTER key. It should look like this:
A S P1AGE CMP(LT 40)
Here's what we have created:
0000.01 A*
0000.02 A* RECORD FORMAT LEVEL
0001.00 A R PFILER1 PFILE(PFILE01)
0001.01 A*
0001.02 A* KEY FIELD LEVEL
0002.00 A K P1LNME
0002.01 A*
0002.02 A* SELECT/OMIT LEVEL
0003.00 A S P1AGE CMP(LT 40)
You Might Also Want To Visit The Following Tutorial Posts:
AS/400 For Dummies
AS/400 Tutorial
SQL/400 Tutorial
Query/400 Tutorial
Read More...
Logical files have 5 DDS levels, levels 1-4 are similar to the DDS levels of physical file. In this chapter I will only explain the 5th DDS level.
1) File Level DDS
2) Record Format Level DDS
3) Field Level DDS
4) Key Field Level DDS
5) Select/Omit Level DDS. The system can select and omit records when using a logical file. This can help you to exclude records in a file for processing convenience or for security.
Let's try creating our first simple logical file. We will use PFILE01 that we created during our PF creation. Just follow these simple steps:
1) Record Format Level DDS. In position 6 of the SEU body enter "A" then press F4, for Name Type Column enter "R" (to indicate a record format name), then on the Name column input "PFILER1" (this one is your record format name). In the functions column enter this keyword; PFILE(PF Name), this will identify the physical file being referenced and it is a required keyword. After you are done hit the ENTER key. It should look like this:
A R PFILER1 PFILE(PFILE01)
2) Key field Level DDS. In position 6 of the SEU body enter "A" then press F4, for Name Type Column enter "K" (to indicate a key field), then on the Name column input "P1LNME" (this represents your first key field). After you are done hit the ENTER key. It should look like this:
A K P1LNME
3) Select/Omit Level DDS. Now let's try to filter some records in our file. In position 6 of the SEU body enter "A" then press F4, for Name Type Column enter "S" (to select specific records), then on the Name column input "P1AGE" (this represents your field to select from). On the functions column type CMP(LT 40), this will enable us to select all records with P1AGE less than 40. After you are done hit the ENTER key. It should look like this:
A S P1AGE CMP(LT 40)
Here's what we have created:
0000.01 A*
0000.02 A* RECORD FORMAT LEVEL
0001.00 A R PFILER1 PFILE(PFILE01)
0001.01 A*
0001.02 A* KEY FIELD LEVEL
0002.00 A K P1LNME
0002.01 A*
0002.02 A* SELECT/OMIT LEVEL
0003.00 A S P1AGE CMP(LT 40)
You Might Also Want To Visit The Following Tutorial Posts:
AS/400 For Dummies
AS/400 Tutorial
SQL/400 Tutorial
Query/400 Tutorial
Tuesday, December 29, 2009
AS/400 Programmer Contacts
For AS/400 Job Seekers, please post your qualifications here:
Sample Information
Name : Juan Dela Cruz
Location : Philippines
E-Mail : jdelacruz@gmail.com
Skills : RPG, RPG-ILE, CL, CL-ILE, SQL/400
Yrs. of Exp. : 5 yrs.
Availability : ASAP
Read More...
Sample Information
Name : Juan Dela Cruz
Location : Philippines
E-Mail : jdelacruz@gmail.com
Skills : RPG, RPG-ILE, CL, CL-ILE, SQL/400
Yrs. of Exp. : 5 yrs.
Availability : ASAP
Read More...
Monday, December 14, 2009
(Tips) AS/400 Free Connection
FREE AS/400 connection, SIGNUP now!
RZKH is a modern and independant Consulting and service company. They offer service in whole germany, austria, switzerland and adjoining countries. Their main business activities cover the IBM system i (also known as iSeries or AS/400).
To connect to the AS/400 you may DOWNLOAD Mochasoft's TN 5250 client for FREE (30 days) or you may use any 5250 telnet program.
Read More...
Thursday, December 10, 2009
(Q&A) How To Display Library Contents Using CL?
(From : aaaadddd1)
Does anyone knows a process or CL that uses DSPLIB to display the contents of a library and their attributes, such as their size and last used date, followed by creating a file that I can query against?
My goal is to first list the name, last used date and size of all objects in a production library and delete objects that have not been used in more than a year.
You can do this by using:
DSPOBJD OBJ(MYLIBRARY/*ALL) OBJTYPE(*ALL) OUTPUT(*OUTFILE)OUTFILE(QTEMP/MYFILE)
Where:
MYLIBRARY - the desired library.
MYFILE - Outfile Filename.
You can use these fields as reference:
ODLBNM - Libray
ODOBNM - Object Name
ODOBTP - Object Type
ODOBSZ - Object Size
ODCDAT - Creation Date
ODCTIM - Creation Time
ODOBOW - Object Owner
ODLDAT - Change Date
ODLTIM - Change Time
I hope this will help you.
Read More...
Wednesday, November 25, 2009
(AS/400 For Dummies) Creating Physical File
We have created source physical files, we can now start creating Physical Files (PF). What is a Physical File? A physical file is a database file that stores application data. It contains a description of how data is to be presented to or received from a program and how data is actually stored in the database. A physical file consists of fixed-length records that can have variable-length fields. Physical files contain one record format and one or more members. From the perspective of the SQL interface, physical files are identical to tables.
Ways to Create Physical Files (PF):
1) Creating PF with DDS.
2) Creating PF without DDS.
3) Creating PF using *OUTFILE parameter.
4) Creating PF using SQL.
5) Using CPYF or CRTDUBOBJ commands.
Method 1: Creating PF with DDS (Data Description Specifications).
Physical Files have 4 DDS levels;
1) File Level DDS. It give the system information about the entire file. For example, you can specify whether all the key field values in the file must be unique.
2) Record format level DDS. It give the system information about a specific record format in the file. For example, when you describe a logical file record format, you can specify the physical file that it is based on.
3) Field level DDS. It give the system information about individual fields in the record format. For example, you can specify the name and attributes of each field.
4) Key field level DDS. It give the system information about the key fields for the file. For example, you can specify which fields in the record format are to be used as key fields.
For us to be able to understand more about these levels, let us start creating our PF.
File Definition:
Field Name, Description, Data Type, Length
P1LNME, Last Name, Character, 20
P1FNME, First Name, Character, 20
P1MINI, Middle Initial, Character, 1
P1AGE, Age Numeric, 2
P1CCDE, Course Code, Character, 5
P1CRDT, Create Date, Numeric, 8
P1CRTM, Create Time, Numeric, 6
P1UPDT, Update Date, Numeric, 8
P1UPTM, Update Time, Numeric, 6
note:
- PF is keyed by Last Name, First Name and Middle Initial.
- Records should be UNIQUE.
First in the command line type STRSEU then press F4 key. For Source File parameter we need to key in "QDDSSRC" (this is the source physical file that will hold PF and LF sources). Then for the Library parameter just input your library, for this tutorial i'll input "MyLibrary". For Source Member just enter "PFILE01" and then for Source Type parameter just enter "PF". Then for the Text Description parameter input "My Very First Physical File". Your screen should look like this:
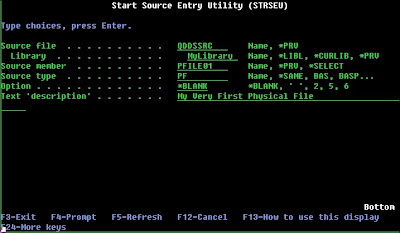
If you are done entering those parameters, just press ENTER key to proceed with DDS entry.
Now, let us create the 4 DDS levels of PF.
1)File level DDS. In position 6 of the SEU body enter "A" then press F4. You'll have a screen like this one:
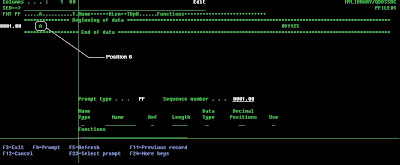
Then in the Functions column type "UNIQUE" then press ENTER key. This line will mark as our file level DDS.
2) Record level DDS. In position 6 of the SEU body enter "A" then press F4, for Name Type Column enter "R" (to indicate a record format name), then on the Name column input "PFILER1" (this one is your record format name). After you are done hit the ENTER key.
3) Field level DDS. In position 6 of the SEU body enter "A" then press F4, for the Name Column enter "P1LNME", Length Column input "20", Data Type Column enter "A", and for the Functions Column input "TEXT('LAST NAME')". Repeat what we have entered for the remaining 8 file fields. For data types; "A" represents character field, "S" (zoned decimal) as numeric field. For numeric field, Decimal Positions Column should have a value, for this exercise just enter "0" for all numeric fields. TEXT keyword is used to enter field descriptions.
4) Key field level DDS. In position 6 of the SEU body enter "A" then press F4, for Name Type Column enter "K" (to indicate a key field), then on the Name column input "P1LNME" (this represents your first key field). After you are done hit the ENTER key. Then do this again for the 2 remaining key fields.
After you are done your screen should look like this:
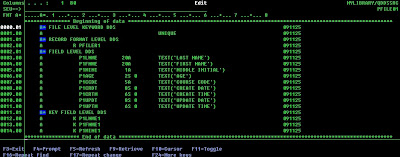
At the SEU command line on the top, just type FILE to save and exit SEU. Then to compile your PF just type this in the command line:
CRTPF FILE(MYLIBRARY/PFILE01) SRCFILE(MYLIBRARY/QDDSSRC) SRCMBR(PFILE01)
Method 2: Creating PF without DDS (Data Description Specifications).
We can create a physical file without DDS. This file will only contain 1 (one) field and by default the field will get the name of the PF. Here's the steps on how to create this type of PF:
a) Type CRTPF in the command line, then press F4.
b) Enter the desired file name in the FILE parameter.
c) Input your desired library.
d) Specify record/field length in the RCDLEN parameter.
e) Press ENTER key.
Your command should look like this one:
CRTPF FILE(QTEMP/MYFILE) RCDLEN(500)
Method 3: Creating PF using *OUTFILE parameter.
For this type of method, we can create PF using DSP command and then set the OUTPUT parameter to *OUTFILE. Here are some of the DSP commands that i normally use to create a PF:
1) DSPFD. I use this command to get file level information of a file and place the information inside a PF.
Command:
DSPFD FILE(MYLIBRARY/MYFILE) OUTPUT(*OUTFILE) OUTFILE(QTEMP/MYOUTFILE)
2) DSPFFD. I use this command to get field level information of a file and place the information inside a PF.
Command:
DSPFFD FILE(MYLIBRAY/MYFILE) OUTPUT(*OUTFILE) OUTFILE(QTEMP/MYOUTFILE)
3) DSPPGMREF. I use this command to get a list of system objects that my program is referencing and place the list inside a PF.
Command:
DSPPGMREF PGM(MYLIBRARY/MYPROGRAM) OUTPUT(*OUTFILE) OUTFILE(QTEMP/MYOUTFILE)
4) DSPDBR. I use this command to get a list of relational information about database files and place the list inside a PF.
Command:
DSPDBR FILE(MYLIBRARY/MYFILE) OUTPUT(*OUTFILE) OUTFILE(QTEMP/MYOUTFILE)
5) DSPFLR. I use this command to get a list of folders/documents and place the list inside a PF.
Command:
DSPFLR FLR(MYFOLDER) TYPE(*DOC) OUTPUT(*OUTFILE) OUTFILE(QTEMP/MYOUTFILE)
note: OUTFILE(QTEMP/MYOUTFILE) - contains the library (QTEMP) and the filename (MYOUTFILE) of the PF that I want to create.
Method 4: Creating PF using SQL.
If you are familiar with SQL, you can also create a PF using this method. Type STRSQL in the command line then press ENTER key. You can now enter SQL statement to create a table.
Sample SQL statement:
CREATE TABLE QTEMP/MYFILE
(FLD1 CHARACTER (3) NOT NULL WITH DEFAULT,
FLD2 NUMERIC (4,0) NOT NULL WITH DEFAULT)
Method 5: Using CPYF or CRTDUBOBJ commands.
You can also create a PF by copying or duplicating existing physical files.
1) Using CPYF:
CPYF FROMFILE(MYLIBRARY/MYFILE) TOFILE(QTEMP/MYCOPY) CRTFILE(*YES)
2) Using CRTDUPOBJ:
CRTDUPOBJ OBJ(MYFILE) FROMLIB(MYLIBRARY) OBJTYPE(*FILE) TOLIB(QTEMP) NEWOBJ(MYOBJECT)
You Might Also Want To Visit The Following Tutorial Posts:
AS/400 For Dummies
AS/400 Tutorial
SQL/400 Tutorial
Query/400 Tutorial
Read More...
Ways to Create Physical Files (PF):
1) Creating PF with DDS.
2) Creating PF without DDS.
3) Creating PF using *OUTFILE parameter.
4) Creating PF using SQL.
5) Using CPYF or CRTDUBOBJ commands.
Method 1: Creating PF with DDS (Data Description Specifications).
Physical Files have 4 DDS levels;
1) File Level DDS. It give the system information about the entire file. For example, you can specify whether all the key field values in the file must be unique.
2) Record format level DDS. It give the system information about a specific record format in the file. For example, when you describe a logical file record format, you can specify the physical file that it is based on.
3) Field level DDS. It give the system information about individual fields in the record format. For example, you can specify the name and attributes of each field.
4) Key field level DDS. It give the system information about the key fields for the file. For example, you can specify which fields in the record format are to be used as key fields.
For us to be able to understand more about these levels, let us start creating our PF.
File Definition:
Field Name, Description, Data Type, Length
P1LNME, Last Name, Character, 20
P1FNME, First Name, Character, 20
P1MINI, Middle Initial, Character, 1
P1AGE, Age Numeric, 2
P1CCDE, Course Code, Character, 5
P1CRDT, Create Date, Numeric, 8
P1CRTM, Create Time, Numeric, 6
P1UPDT, Update Date, Numeric, 8
P1UPTM, Update Time, Numeric, 6
note:
- PF is keyed by Last Name, First Name and Middle Initial.
- Records should be UNIQUE.
First in the command line type STRSEU then press F4 key. For Source File parameter we need to key in "QDDSSRC" (this is the source physical file that will hold PF and LF sources). Then for the Library parameter just input your library, for this tutorial i'll input "MyLibrary". For Source Member just enter "PFILE01" and then for Source Type parameter just enter "PF". Then for the Text Description parameter input "My Very First Physical File". Your screen should look like this:
If you are done entering those parameters, just press ENTER key to proceed with DDS entry.
Now, let us create the 4 DDS levels of PF.
1)File level DDS. In position 6 of the SEU body enter "A" then press F4. You'll have a screen like this one:
Then in the Functions column type "UNIQUE" then press ENTER key. This line will mark as our file level DDS.
2) Record level DDS. In position 6 of the SEU body enter "A" then press F4, for Name Type Column enter "R" (to indicate a record format name), then on the Name column input "PFILER1" (this one is your record format name). After you are done hit the ENTER key.
3) Field level DDS. In position 6 of the SEU body enter "A" then press F4, for the Name Column enter "P1LNME", Length Column input "20", Data Type Column enter "A", and for the Functions Column input "TEXT('LAST NAME')". Repeat what we have entered for the remaining 8 file fields. For data types; "A" represents character field, "S" (zoned decimal) as numeric field. For numeric field, Decimal Positions Column should have a value, for this exercise just enter "0" for all numeric fields. TEXT keyword is used to enter field descriptions.
4) Key field level DDS. In position 6 of the SEU body enter "A" then press F4, for Name Type Column enter "K" (to indicate a key field), then on the Name column input "P1LNME" (this represents your first key field). After you are done hit the ENTER key. Then do this again for the 2 remaining key fields.
After you are done your screen should look like this:
At the SEU command line on the top, just type FILE to save and exit SEU. Then to compile your PF just type this in the command line:
CRTPF FILE(MYLIBRARY/PFILE01) SRCFILE(MYLIBRARY/QDDSSRC) SRCMBR(PFILE01)
Method 2: Creating PF without DDS (Data Description Specifications).
We can create a physical file without DDS. This file will only contain 1 (one) field and by default the field will get the name of the PF. Here's the steps on how to create this type of PF:
a) Type CRTPF in the command line, then press F4.
b) Enter the desired file name in the FILE parameter.
c) Input your desired library.
d) Specify record/field length in the RCDLEN parameter.
e) Press ENTER key.
Your command should look like this one:
CRTPF FILE(QTEMP/MYFILE) RCDLEN(500)
Method 3: Creating PF using *OUTFILE parameter.
For this type of method, we can create PF using DSP command and then set the OUTPUT parameter to *OUTFILE. Here are some of the DSP commands that i normally use to create a PF:
1) DSPFD. I use this command to get file level information of a file and place the information inside a PF.
Command:
DSPFD FILE(MYLIBRARY/MYFILE) OUTPUT(*OUTFILE) OUTFILE(QTEMP/MYOUTFILE)
2) DSPFFD. I use this command to get field level information of a file and place the information inside a PF.
Command:
DSPFFD FILE(MYLIBRAY/MYFILE) OUTPUT(*OUTFILE) OUTFILE(QTEMP/MYOUTFILE)
3) DSPPGMREF. I use this command to get a list of system objects that my program is referencing and place the list inside a PF.
Command:
DSPPGMREF PGM(MYLIBRARY/MYPROGRAM) OUTPUT(*OUTFILE) OUTFILE(QTEMP/MYOUTFILE)
4) DSPDBR. I use this command to get a list of relational information about database files and place the list inside a PF.
Command:
DSPDBR FILE(MYLIBRARY/MYFILE) OUTPUT(*OUTFILE) OUTFILE(QTEMP/MYOUTFILE)
5) DSPFLR. I use this command to get a list of folders/documents and place the list inside a PF.
Command:
DSPFLR FLR(MYFOLDER) TYPE(*DOC) OUTPUT(*OUTFILE) OUTFILE(QTEMP/MYOUTFILE)
note: OUTFILE(QTEMP/MYOUTFILE) - contains the library (QTEMP) and the filename (MYOUTFILE) of the PF that I want to create.
Method 4: Creating PF using SQL.
If you are familiar with SQL, you can also create a PF using this method. Type STRSQL in the command line then press ENTER key. You can now enter SQL statement to create a table.
Sample SQL statement:
CREATE TABLE QTEMP/MYFILE
(FLD1 CHARACTER (3) NOT NULL WITH DEFAULT,
FLD2 NUMERIC (4,0) NOT NULL WITH DEFAULT)
Method 5: Using CPYF or CRTDUBOBJ commands.
You can also create a PF by copying or duplicating existing physical files.
1) Using CPYF:
CPYF FROMFILE(MYLIBRARY/MYFILE) TOFILE(QTEMP/MYCOPY) CRTFILE(*YES)
2) Using CRTDUPOBJ:
CRTDUPOBJ OBJ(MYFILE) FROMLIB(MYLIBRARY) OBJTYPE(*FILE) TOLIB(QTEMP) NEWOBJ(MYOBJECT)
You Might Also Want To Visit The Following Tutorial Posts:
AS/400 For Dummies
AS/400 Tutorial
SQL/400 Tutorial
Query/400 Tutorial
Friday, October 16, 2009
(Query/400 Tutorial) Selecting definition steps when defining a Query/400 query
When you specify option 1 (Create) on the Work with Queries display, you are shown the Define the Query display (another key display) where you select one, several, or all of the 11 definition steps (options) needed to define your query.
The only definition step that you are required to select is Specify file selections. You do not have to select all of these definition steps—use only those that you need. Most of these steps do not have to be done in a specific order (although the order shown is recommended when you need to use most of them). Each step you select is a separate process that shows you one or more displays as you need them.
The only definition step that you are required to select is Specify file selections. You do not have to select all of these definition steps—use only those that you need. Most of these steps do not have to be done in a specific order (although the order shown is recommended when you need to use most of them). Each step you select is a separate process that shows you one or more displays as you need them.
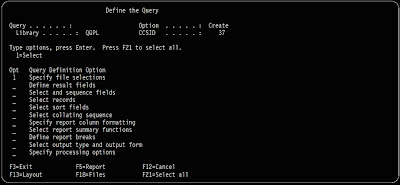
The Define the Query display is the primary display from which you start defining your query.
From this display, you can select options that define, generally speaking, the four major parts of a complete query definition:
- The first six options define the query itself, including the files you want to query, the fields to be used in each file, and the records to be selected.
- The next three options define what the report is to look like, including which columns are to be summarized and when (using report breaks).
- The second to last option defines where the report is to go and what values are to be used when it is sent there.
- The last option defines how numeric calculation results are processed and if substitution
characters are allowed during the conversion of character fields.
You Might Also Want To Visit The Following Tutorial Posts:
AS/400 For Dummies
AS/400 Tutorial
SQL/400 Tutorial
Query/400 Tutorial
Wednesday, September 30, 2009
(Query/400 Tutorial) Starting Query/400 query definition
You start query definition by selecting option 1 (Create) on the Work with Queries display and, optionally, by specifying the name of the query you want to create.
To specify a query name, you can type the name of the query (Query prompt) that you want to define, and you can specify the name of the library (Library prompt) in which it is to be stored. Or, you can look at a list of query names or library names to select the query name and the library name you want to use.
For example, you might specify CUSNAMQRY as the name of a query definition that you would use to query the CUSTNAME file. If you do not specify a library name, the query is stored in the library identified in the Library prompt.
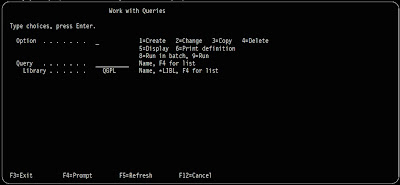
If you are creating a query (definition), you do not need to name it unless you want to save it for later use. (The query does not exist as a definition object on the system until you save it.) If you do name it, use the normal rule for naming objects, which follows:
The query name must begin with an alphabetic character (A through Z, $, #, or @) and can be followed by no more than 9 alphanumeric characters (A through Z, 0 through 9, $, #, @, ., or _).
Note: To use this query in a multilingual environment, use A-Z or 1-9.
Because most system-supplied objects on the AS/400 system begin with Q, your query names should not start with a Q.
If you position the cursor on the Query prompt and press F4 (Prompt) to show a list, it contains the names of all the queries that are in the library (or libraries) indicated by the Library prompt. You can get a smaller list by typing a generic name in the Query prompt before you press F4. The generic name shows in the Subset prompt when the list is shown.
When you are creating a query, you can check this list to see what names are already used before you choose a new name. Type the new name in the first list position (in its input field) and type a 1 next to it.
You Might Also Want To Visit The Following Tutorial Posts:
AS/400 For Dummies
AS/400 Tutorial
SQL/400 Tutorial
Query/400 Tutorial
Read More...
Tuesday, September 29, 2009
(Q&A) SAVLIB Error
I would like to know how to not encounter error when using savlib command
SAVLIB LIB(&LIBL) the &LIBL: as the parm and has 500 length (ex. 10 libraries inside)..
in the command prompt when SAVLIB is used:
LIB should appear as this :
MLIB
XLIB
SLIB
but.. when the RPG calls the CL it becomes
'MLIB XLIB SLIB' -- it is transferred as one constant how can i pass the parameter and let the command be as shown as above ?
(From : Lui)
Answer:
You can use QCMDEXC to run the command. Your command string parameter should contain: "SAVLIB LIB(LUILIB LEALIB XXXLIB)", you can obtain this by using series of string manipulation command then don't forget to pass the command string length.
Read More...
Friday, September 25, 2009
(Query/400 Tutorial) Getting Started With Query/400
Getting started with Query/400
You can access Query in a variety of ways. To use Query, you can do any of the following:
- Use the Work With Query (WRKQRY) command by typing WRKQRY and pressing the Enter key. This
causes the Work with Queries display to appear.
-Select option 3 (Decision support) on the Office Tasks (OFCTSK) menu. From the Decision Support display, select option 2 (Query). This causes the Query menu to appear.
- Select option 8 (Decision support) on the Office menu. From the Decision Support display, select option 2 (Query). This causes the Query menu to appear.
- Use the Start Query (STRQRY) command by typing STRQRY and pressing the Enter key. This causes the Query menu to appear. Typing GO QUERY and pressing the Enter key has the same effect.
- While using OfficeVision, press F17 on the edit display and then select option 1 (Query). This causes the Work with Queries display to appear.
- While using the DisplayWrite 4 program, press the control key and F6 on the edit display. Select option 2 (Get query file option). This is explained in detail in the DisplayWrite 4 or DisplayWrite 5 help information. This causes the Work with Queries display to appear.
From the Query menu, you can choose to work with queries, run a query, delete a query, work with files, or do an office-related task.
From the Work with Queries display you can:
- Create, change, copy, delete, display, print, or run a query if you came from the Query menu or the WRKQRY command.
- Create,change, copy, delete, or display a query definition, or you can do direct merge, column list merge, or multicopy merge if you came from OfficeVision.
- Create, change, copy, delete, or display a query definition, or you can do direct merge if you came from the DisplayWrite 4 or DisplayWrite 5 program.
You Might Also Want To Visit The Following Tutorial Posts:
AS/400 For Dummies
AS/400 Tutorial
SQL/400 Tutorial
Query/400 Tutorial
Read More...
From the Work with Queries display you can:
- Create, change, copy, delete, display, print, or run a query if you came from the Query menu or the WRKQRY command.
- Create,change, copy, delete, or display a query definition, or you can do direct merge, column list merge, or multicopy merge if you came from OfficeVision.
- Create, change, copy, delete, or display a query definition, or you can do direct merge if you came from the DisplayWrite 4 or DisplayWrite 5 program.
You Might Also Want To Visit The Following Tutorial Posts:
AS/400 For Dummies
AS/400 Tutorial
SQL/400 Tutorial
Query/400 Tutorial
Thursday, September 24, 2009
(Query/400 Tutorial) Query/400 fundamentals
Several elements on your system organize and store information, or data, so that you and other system users can work with it to get the results that you need. The following topics introduce those elements, tell you about them and how they relate to you and Query, and direct you to other publications where you can find more information.
Files, fields, and record formats in Query/400
----------------------------------------------
Information, or data, is organized and stored on your system in various forms, primarily in objects called database files (usually referred to as just files). A file contains individual units of information, called records, that each contain related pieces of data. Each piece of information in a record is called a field, and how the fields are organized is defined in a record format (often just called a format).
When you run a query to produce a report, Query uses the files, fields, and record formats to get the information you want from the database, in the form of records, and uses those records to produce a query report.
Double-byte character set (DBCS) fields in Query/400
----------------------------------------------------
Some countries use pictographs or symbolic characters in their language. DBCS fields must be used for such data. As a general rule, if your national language uses single-byte character set (SBCS) characters, your files do not contain DBCS data. You can ignore any on-line help information that refers to DBCS data.
Notes:
1. To properly display DBCS data, you need a DBCS-capable display.
2. In Query, the following naming convention is used for DBCS data:
- Character data refers to both SBCS and DBCS character data.
- DBCS data refers to any type of DBCS data, including bracketed-DBCS and DBCS-graphic data types.
- Bracketed DBCS refers to DBCS-open, DBCS-either, or DBCS-only data types.
UCS2 level 1 character set support in Query/400
-----------------------------------------------
UCS2 Level 1 is a 16-bit encoding for graphic characters. When doing business in a worldwide environment you need the ability to enter and process data from more than one national language. For example, a list of customer names may contain German, Greek, English, and Thai characters that must be printed or displayed on the same device at the same time.
Query/400 treats UCS2-graphic data the same as GRAPHIC or VARGRAPHIC data. A UCS2-graphic field is a DBCS-graphic field tagged with a UCS2 CCSID.
The VARCHAR and VARGRAPHIC functions help you write queries that include UCS2 data.
Data definition languages and utilities support in Query/400
------------------------------------------------------------
Query can query data in files that are created using different data definition languages or products. Although the description given above applies to all the files on your system, the names or concepts that might be used depend on the programming language or product (like IDDU, DDS, and DB2 UDB for iSeries) that is used to define the files.
You Might Also Want To Visit The Following Tutorial Posts:
AS/400 For Dummies
AS/400 Tutorial
SQL/400 Tutorial
Query/400 Tutorial
(Query/400 Tutorial) What is Query/400?
Query/400 is an IBM licensed program and a decision support utility that can be used to obtain information from the AS/400* (AS/400*) database. It can obtain information from any database files that have been defined on the system using Operating System/400* (OS/400*) data description specifications (DDS), the OS/400 interactive data definition utility (IDDU), or the IBM* Structured Query Language/400 (DB2 UDB for iSeries*) program.
You use Query to select, arrange, and analyze information (data) stored in one or more database files to produce reports and other data files. You can create your own query definitions and then run them, you can run existing queries that you did not create, or you can even run a default query against a particular database file (using an unnamed query). You determine what data the query is to retrieve, the format of the report, and whether it should be displayed, printed, or sent to another database file.
You can use Query to obtain information from a single file or a combined set of up to 32 files. You can select all the fields, or a few of the fields and organize them as you want them to appear in the type of output chosen. You can have all records in the files included in the output, or you can select only a few to be included, using record selection tests. These and other functions are described in detail later.
This tutorial begins by introducing basic information about Query, and then it introduces all the major tasks (such as creating, displaying, or running query) that can be done using Query, including the data/text merge options that can be used by IBM OfficeVision*, DisplayWrite* 4, and DisplayWrite 5 users.
You Might Also Want To Visit The Following Tutorial Posts:
AS/400 For Dummies
AS/400 Tutorial
SQL/400 Tutorial
Query/400 Tutorial


Wednesday, September 9, 2009
(Q&A) How To Convert AS/400 File To Excel Compatible Format
I just want to ask on how can i go about transfering a flat file to an excel file, which uses comma (,) as a delimeter. And how about if it's from a physical file and i want to transfer it to an excel file? Can you also provide a link on how to do it or maybe you can give me a step by step sample program.
(From : kNOw_wELL)
For the first question you can use FTP to transfer your flat file from AS/400 to your desktop. Use your desktop's dos shell to manually FTP your file. You can use the following commands:
a. FTP (AS/400 IP Address)
b. Enter AS/400 Username
c. Password AS/400 Password
d. Binary
e. Get MYLIB/MYFLATFILE C:\MYFILE.CSV
f. Quit
Now if you want to transfer your PF to your desktop, you need to convert your PF first into a delimeted flatfile format. You can concatenate (,) or (X'05') delimeter inbetween fields then write it in a flatfile. Or you can use CPYTOIMPF to automatically convert your PF into delimeted flatfile format.
Sample:
CPYTOIMPF FROMFILE(MYLIB/MYPF) TOFILE(MYLIB/MYFLATFILE) MBROPT(*ADD) STRDLM(*NONE) FLDDLM(&HEX)
Where &Hex contains hexadecimal constant X'05'.
After converting your PF into flatfile you can now use FTP.
Note:
- For comma delimeter, use .CSV as your file extension format.
- For X'05' delimeter, use .XLS as your file extension format.
For batch FTP, first create a simple CL program. Let's call ours FTPSCRIPT. In it we'll
have these lines:
PGM PARM(&RMTSYSTEM)
DCL VAR(&RMTSYSTEM) TYPE(*CHAR) LEN(200)
OVRDBF FILE(INPUT) TOFILE(MYLIB/FTPSCRIPT)
OVRDBF FILE(OUTPUT) TOFILE(MYLIB/FTPOUTPUT)
FTP RMTSYS(&RMTSYSTEM)
DLTOVR FILE(INPUT)
DLTOVR FILE(OUTPUT)
ENDPGM
The file MYLIB/FTPSCRIPT should be a one field file. The record length is pretty flexible.
The file MYLIB/FTPOUTPUT should also be a one field file. Again, the record length is pretty flexible. In the file MYLIB/FTPSCRIPT put the following:
user myuserid mypassword
cd mylib
quote rcmd crtpf mylib/myfile rcdlen(80)
put myfile.txt myfile
quote rcmd runpost
quit
Now when you type CALL FTPSCRIPT it will run the CL program FTPSCRIPT, which will use the FTPSCRIPT file. You can use DSPPFM/RUNQRY or some other utility to check the FTPOUTPUT file for the status of the transmission.
Read More...
Wednesday, August 26, 2009
(Tips) Copying data using Client Access Data Transfer Function
The Client Access Data Transfer applications have the advantage of an easy-to-follow graphical interface, and automatic numeric and character data conversion. However, Data Transfer requires the installation of the Client Access product and requires use of both PC and iSeries server resources and communications between the two.
If you have Client Access installed on the PC and your server, you can use the Data Transfer applications to transfer data between stream files and database files. You can also transfer data into a new database file based on an existing database file, into an externally-described database file, or into a new database file definition and file.
* Transfer data from a database file to a stream file.
* Transfer data from a stream file to a database file.
* Move data into a newly created database file definition and file.
* Create a format description file.
Transfer data from a database file to a stream file
To transfer a file from a database file to a stream file on your server:
1. Establish a connection to the server.
2. Map a network drive to the appropriate path in the iSeries file system.
3. Select the Data Transfer from AS/400 icon from the Client Access Express window.
4. Select the server you want to transfer from.
5. Select the file names, using the iSeries database library and file name to copy from, and the network drive for the location of the resulting stream file. You can also choose PC File Details to select the PC file format for the stream file. Data Transfer supports common PC file types, such as ASCII text, BIFF3, CSV, DIF, Tab-delimited Text, or WK4.
6. Click the Transfer data from AS/400 button to run the file transfer.
You can also perform this data movement in a batch job with the Data Transfer applications. Proceed as above, but select the File menu option to save the transfer request. The Data Transfer To AS/400 application creates a .DTT or a .TFR file. The Data Transfer from AS/400 application creates a .DTF or a .TTO file. In the Client Access directory, two programs can be run in batch from a command line:
* RTOPCB takes either a .DTF or a .TTO file as a parameter
* RFROMPCB takes either a .DTT or a .TFR file as a parameter
You can set either of these commands to run on a scheduled basis by using a scheduler application. For example, you can use the System Agent Tool (a part of the Microsoft Plus Pack) to specify the program to run (for instance, RTOPCB MYFILE.TTO) and the time at which you want to run the program.
Transfer data from a stream file to a database file
To transfer data from a stream file to a database file on your server:
1. Establish a connection to the server.
2. Map a network drive to the appropriate path in the iSeries file system.
3. Select the Data Transfer to AS/400 icon from the Client Access Express window.
4. Select the PC file name you want to transfer. For the PC file name, you can choose Browse for the network drive you assigned, and choose a stream file. You can also use a stream file located on the PC itself.
5. Select the server on which you want the externally described database file to be located.
6. Click the Transfer data to AS/400 button to run the file transfer.
Note: If you are moving data to an existing database file definition on the server, the Data Transfer To AS/400 application requires you to use an associated format description file (FDF). An FDF file describes the format of a stream file, and is created by the Data Transfer from AS/400 application when data is transferred from a database file to a stream file. To complete the transfer of data from a stream file to a database file, click the Transfer to AS/400 button. If an existing .FDF file is not available, you can quickly create an .FDF file.
You can also perform this data movement in a batch job with the Data Transfer applications. Proceed as above, but select the File menu option to save the transfer request. The Data Transfer To AS/400 application creates a .DTT or a .TFR file. The Data Transfer from AS/400 application creates a .DTF or a .TTO file. In the Client Access directory, two programs can be run in batch from a command line:
* RTOPCB takes either a .DTF or a .TTO file as a parameter
* RFROMPCB takes either a .DTT or a .TFR file as a parameter
You can set either of these commands to run on a scheduled basis by using a scheduler application. For example, you can use the System Agent Tool (a part of the Microsoft Plus Pack) to specify the program to run (for instance, RTOPCB MYFILE.TTO) and the time at which you want to run the program.
Move data into a newly created database file definition and file
To move data into a newly created database file definition and file:
1. Establish a connection to the server.
2. Map a network drive to the appropriate path in the iSeries file system.
3. Select the Data Transfer to AS/400 icon from the Client Access Express window.
4. Open the Tools menu of the Data Transfer to AS/400 application.
5. Select Create AS/400 database file.
A wizard will appear that allows you to create an new AS/400 database file from an existing PC file. You will be required to specify the name of the PC file from which the AS/400 file will be based, the name of the AS/400 file which to create, and several other necessary details. This tool parses a given stream file to determine the number, type, and size of the fields that are required in the resulting database file. The tool can then create the database file definition on your server.
Integrated File System Introduction
Create a format description file
If you are moving data to an existing database file definition on the server, the Data Transfer To AS/400 application requires you to use an associated format description file (FDF). An FDF file describes the format of a stream file, and is created by the Data Transfer from AS/400 application when data is transferred from a database file to a stream file. To create a .FDF file:
1. Create an externally described database file with a format that matches your source stream file (number of fields, types of data).
2. Create one temporary data record within the database file.
3. Use the Data Transfer from AS/400 function to create a stream file and its associated .FDF file from this database file.
4. Now, you can use the Data Transfer to AS/400, and specify this .FDF file with the source stream file you want to transfer.
Source : Iseries Information Center
Read More...
If you have Client Access installed on the PC and your server, you can use the Data Transfer applications to transfer data between stream files and database files. You can also transfer data into a new database file based on an existing database file, into an externally-described database file, or into a new database file definition and file.
* Transfer data from a database file to a stream file.
* Transfer data from a stream file to a database file.
* Move data into a newly created database file definition and file.
* Create a format description file.
Transfer data from a database file to a stream file
To transfer a file from a database file to a stream file on your server:
1. Establish a connection to the server.
2. Map a network drive to the appropriate path in the iSeries file system.
3. Select the Data Transfer from AS/400 icon from the Client Access Express window.
4. Select the server you want to transfer from.
5. Select the file names, using the iSeries database library and file name to copy from, and the network drive for the location of the resulting stream file. You can also choose PC File Details to select the PC file format for the stream file. Data Transfer supports common PC file types, such as ASCII text, BIFF3, CSV, DIF, Tab-delimited Text, or WK4.
6. Click the Transfer data from AS/400 button to run the file transfer.
You can also perform this data movement in a batch job with the Data Transfer applications. Proceed as above, but select the File menu option to save the transfer request. The Data Transfer To AS/400 application creates a .DTT or a .TFR file. The Data Transfer from AS/400 application creates a .DTF or a .TTO file. In the Client Access directory, two programs can be run in batch from a command line:
* RTOPCB takes either a .DTF or a .TTO file as a parameter
* RFROMPCB takes either a .DTT or a .TFR file as a parameter
You can set either of these commands to run on a scheduled basis by using a scheduler application. For example, you can use the System Agent Tool (a part of the Microsoft Plus Pack) to specify the program to run (for instance, RTOPCB MYFILE.TTO) and the time at which you want to run the program.
Transfer data from a stream file to a database file
To transfer data from a stream file to a database file on your server:
1. Establish a connection to the server.
2. Map a network drive to the appropriate path in the iSeries file system.
3. Select the Data Transfer to AS/400 icon from the Client Access Express window.
4. Select the PC file name you want to transfer. For the PC file name, you can choose Browse for the network drive you assigned, and choose a stream file. You can also use a stream file located on the PC itself.
5. Select the server on which you want the externally described database file to be located.
6. Click the Transfer data to AS/400 button to run the file transfer.
Note: If you are moving data to an existing database file definition on the server, the Data Transfer To AS/400 application requires you to use an associated format description file (FDF). An FDF file describes the format of a stream file, and is created by the Data Transfer from AS/400 application when data is transferred from a database file to a stream file. To complete the transfer of data from a stream file to a database file, click the Transfer to AS/400 button. If an existing .FDF file is not available, you can quickly create an .FDF file.
You can also perform this data movement in a batch job with the Data Transfer applications. Proceed as above, but select the File menu option to save the transfer request. The Data Transfer To AS/400 application creates a .DTT or a .TFR file. The Data Transfer from AS/400 application creates a .DTF or a .TTO file. In the Client Access directory, two programs can be run in batch from a command line:
* RTOPCB takes either a .DTF or a .TTO file as a parameter
* RFROMPCB takes either a .DTT or a .TFR file as a parameter
You can set either of these commands to run on a scheduled basis by using a scheduler application. For example, you can use the System Agent Tool (a part of the Microsoft Plus Pack) to specify the program to run (for instance, RTOPCB MYFILE.TTO) and the time at which you want to run the program.
Move data into a newly created database file definition and file
To move data into a newly created database file definition and file:
1. Establish a connection to the server.
2. Map a network drive to the appropriate path in the iSeries file system.
3. Select the Data Transfer to AS/400 icon from the Client Access Express window.
4. Open the Tools menu of the Data Transfer to AS/400 application.
5. Select Create AS/400 database file.
A wizard will appear that allows you to create an new AS/400 database file from an existing PC file. You will be required to specify the name of the PC file from which the AS/400 file will be based, the name of the AS/400 file which to create, and several other necessary details. This tool parses a given stream file to determine the number, type, and size of the fields that are required in the resulting database file. The tool can then create the database file definition on your server.
Integrated File System Introduction
Create a format description file
If you are moving data to an existing database file definition on the server, the Data Transfer To AS/400 application requires you to use an associated format description file (FDF). An FDF file describes the format of a stream file, and is created by the Data Transfer from AS/400 application when data is transferred from a database file to a stream file. To create a .FDF file:
1. Create an externally described database file with a format that matches your source stream file (number of fields, types of data).
2. Create one temporary data record within the database file.
3. Use the Data Transfer from AS/400 function to create a stream file and its associated .FDF file from this database file.
4. Now, you can use the Data Transfer to AS/400, and specify this .FDF file with the source stream file you want to transfer.
Source : Iseries Information Center
Monday, August 17, 2009
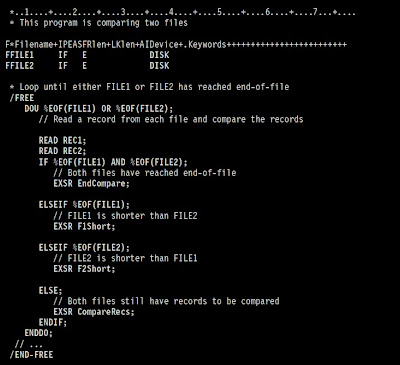
(Tips) AS/400 Built In Functions %EOF
%EOF returns ’1’ if the most recent read operation or write to a subfile ended in an
end of file or beginning of file condition; otherwise, it returns ’0’.
The operations that set %EOF are:
“READ (Read a Record)”
“READC (Read Next Changed Record)”
“READE (Read Equal Key)”
“READP (Read Prior Record)”
“READPE (Read Prior Equal)”
“WRITE (Create New Records)” subfile only).
The following operations, if successful, set %EOF(filename) off. If the operation is
not successful, %EOF(filename) is not changed. %EOF with no parameter is not
changed by these operations.
“CHAIN (Random Retrieval from a File)”
“OPEN (Open File for Processing)”
“SETGT (Set Greater Than)”
“SETLL (Set Lower Limit)”
When a full-procedural file is specified, this function returns ’1’ if the previous
operation in the list above, for the specified file, resulted in an end of file or
beginning of file condition. For primary and secondary files, %EOF is available
only if the file name is specified. It is set to ’1’ if the most recent input operation
during *GETIN processing resulted in an end of file or beginning of file condition.
Otherwise, it returns ’0’.
This function is allowed for input, update, and record-address files; and for display
files allowing WRITE to subfile records.
Read More...
end of file or beginning of file condition; otherwise, it returns ’0’.
The operations that set %EOF are:
“READ (Read a Record)”
“READC (Read Next Changed Record)”
“READE (Read Equal Key)”
“READP (Read Prior Record)”
“READPE (Read Prior Equal)”
“WRITE (Create New Records)” subfile only).
The following operations, if successful, set %EOF(filename) off. If the operation is
not successful, %EOF(filename) is not changed. %EOF with no parameter is not
changed by these operations.
“CHAIN (Random Retrieval from a File)”
“OPEN (Open File for Processing)”
“SETGT (Set Greater Than)”
“SETLL (Set Lower Limit)”
When a full-procedural file is specified, this function returns ’1’ if the previous
operation in the list above, for the specified file, resulted in an end of file or
beginning of file condition. For primary and secondary files, %EOF is available
only if the file name is specified. It is set to ’1’ if the most recent input operation
during *GETIN processing resulted in an end of file or beginning of file condition.
Otherwise, it returns ’0’.
This function is allowed for input, update, and record-address files; and for display
files allowing WRITE to subfile records.

Read More...
Saturday, August 15, 2009
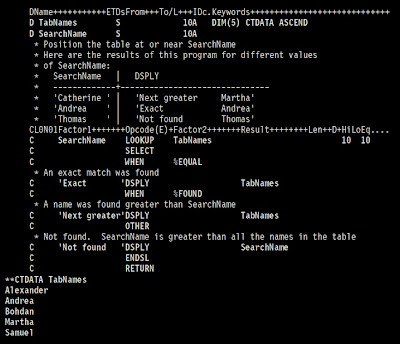
(Tips) AS/400 Built In Functions %Equal
%EQUAL (Return Exact Match Condition)
%EQUAL returns ’1’ if the most recent relevant operation found an exact match;
otherwise, it returns ’0’.
The operations that set %EQUAL are:
“SETLL (Set Lower Limit)”
“LOOKUP (Look Up a Table or Array Element)”
If %EQUAL is used without the optional file_name parameter, then it returns the
value set for the most recent relevant operation.
For the SETLL operation, this function returns ’1’ if a record is present whose key
or relative record number is equal to the search argument.
For the LOOKUP operation with the EQ indicator specified, this function returns
’1’ if an element is found that exactly matches the search argument.
If a file name is specified, this function applies to the most recent SETLL operation
for the specified file.
Examples:
Read More...
%EQUAL returns ’1’ if the most recent relevant operation found an exact match;
otherwise, it returns ’0’.
The operations that set %EQUAL are:
“SETLL (Set Lower Limit)”
“LOOKUP (Look Up a Table or Array Element)”
If %EQUAL is used without the optional file_name parameter, then it returns the
value set for the most recent relevant operation.
For the SETLL operation, this function returns ’1’ if a record is present whose key
or relative record number is equal to the search argument.
For the LOOKUP operation with the EQ indicator specified, this function returns
’1’ if an element is found that exactly matches the search argument.
If a file name is specified, this function applies to the most recent SETLL operation
for the specified file.
Examples:

Read More...
Subscribe to:
Posts (Atom)


